
Category Archives: Space
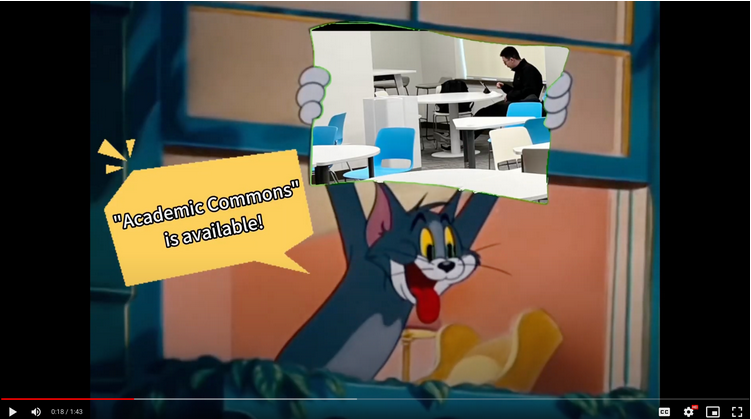
Roary’s Tip: Academic Commons
Academic Commons is a versatile and dynamic space meticulously crafted to foster collaborative work and inspire creativity. This vibrant space offers a multitude of furniture configurations, carefully selected to accommodate diverse needs and preferences.
To gain a deeper understanding of the thoughtfully designed space, we invite you to click on the video below.
Roary’s Tip: Library Volume Zone Zone Guide (Part Two)
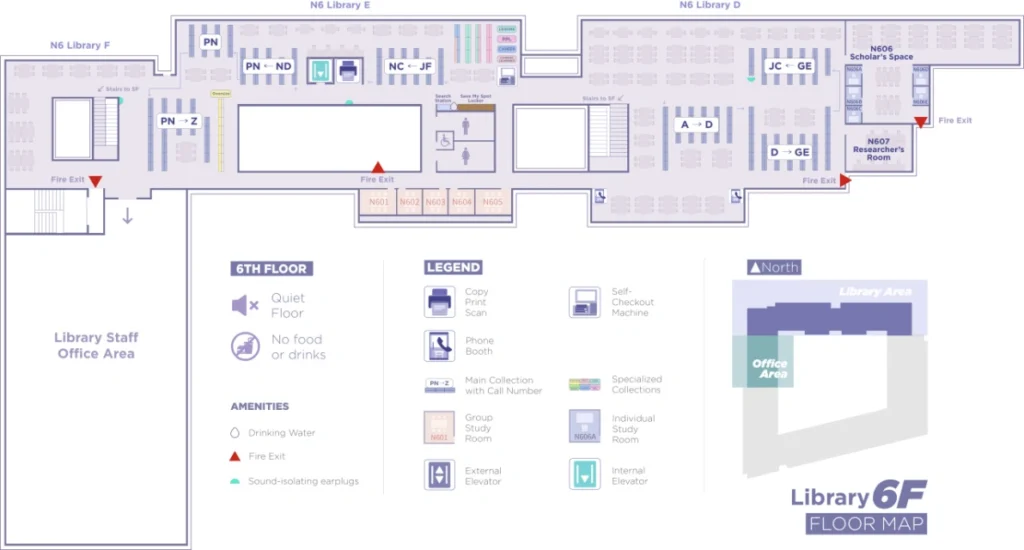
Hi Roary, just to clarify, the library’s “Quiet Zone” is on the 6th floor, right?
Yes, the entire 6th floor and the Course Reserve and Media Room on the 5th floor are quiet zones where no talking is permitted.
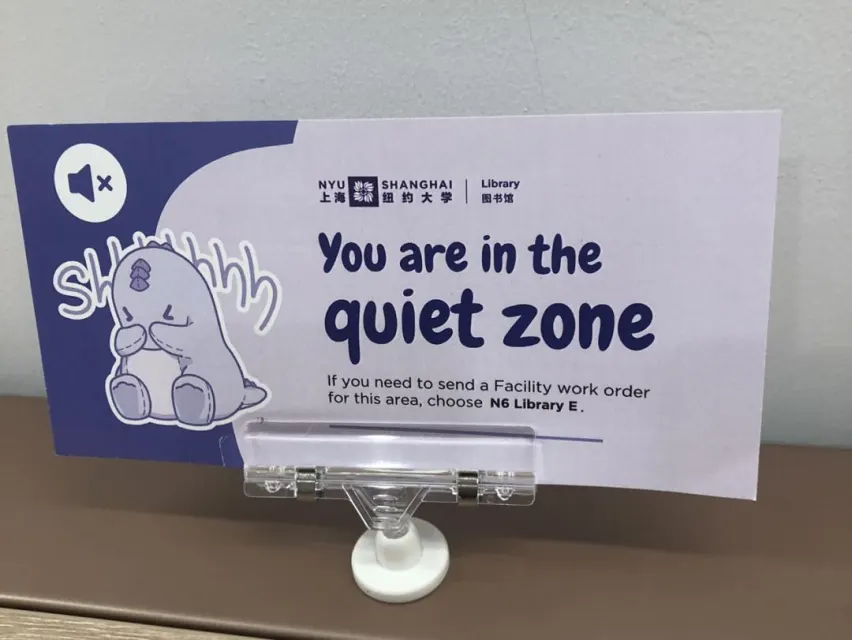

The library also provides complimentary earplugs to help block out distractions in the “quiet zone.” You can find dispensers for earplugs in two locations: one beside the stairs in front of the 6th-floor library offices and another across from the elevator on the 6th floor.

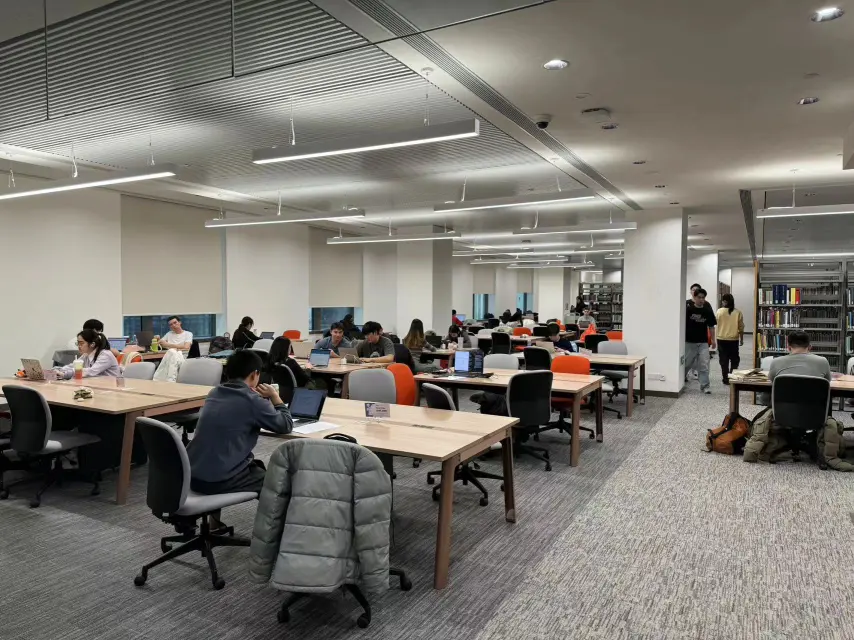
Usually, I prefer working in quiet, but today I’m looking for a spot to work on a group project. We will be talking to each other and watching videos. Where would be the best study spot for us?
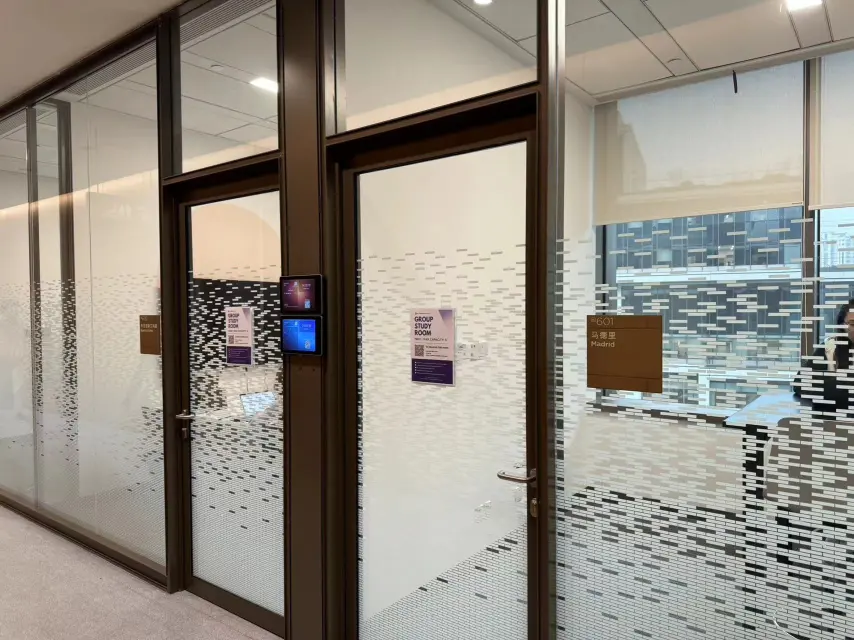
For lively discussions, playing videos without headphones, or joining video calls or Zoom meetings, you should go to the “Collaborative Zone” which are the group study rooms.
Happy studying, we hope that you now know the different library volume zones!
Roary’s Tip: Library Volume Zone Guide (Part One)
Hi Roary, I noticed there are new signs on the library tables labeled with zone designations. I was sitting at a “considerate zone” table the other day. It says we should discuss in a low volume. What other library zones are there?

Currently, three types of spaces in the library accommodate different student study needs: Considerate, Quiet, and Collaborative. The floor map delineates three library zones in distinct color.
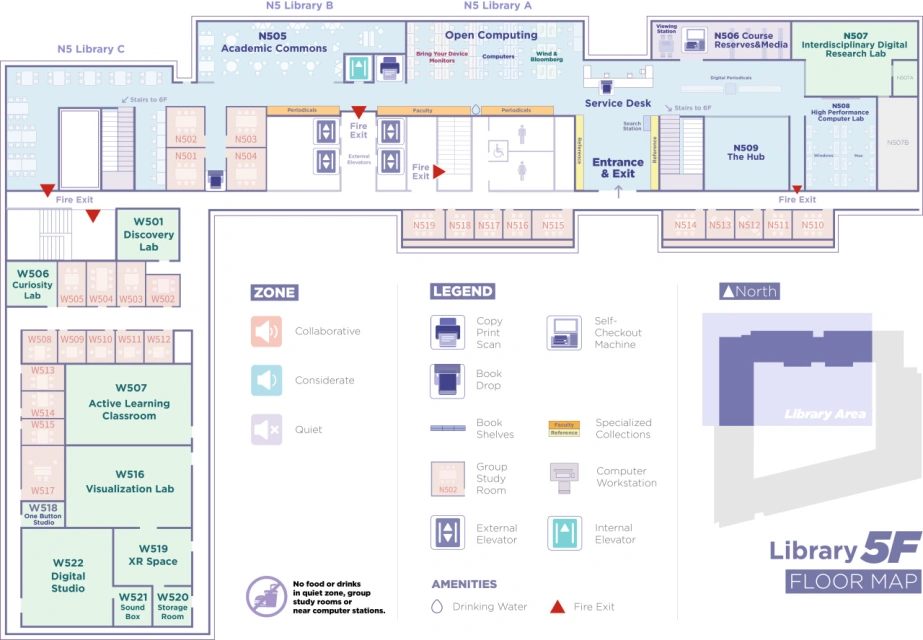
The “considerate zone” is the majority of the library’s 5th floor, except the Course Reserve & Media room, which is a “quiet zone.”
Typically, I prefer working in the quiet zone, but today I’m looking for a spot to work on a report with classmates. We will mostly be on our laptops researching and occasionally talking to each other to figure out the data we want to use for the report. Can we do this in the “considerate zone”?
Yes, I recommend “Academic Commons” in the “Considerate Zone” as the most suitable space for this requirement. Please be mindful of those around you and keep your discussion volumes low.
We will choose “Academic Commons” as a perfect space for our work. Thanks Roary!
No problem, ask me any other questions that you may have at any time!
Roary’s Tip: You Wouldn’t Believe it! This Room Beats Them All!
Got some exciting news to share! We found out the top stars among our group study rooms through data analysis.
Which room do you think takes the top spot?
Does the biggest one always win?
Or maybe the small cozy ones get more likes?
Let’s see the rankings together!
No.5 W510
No.4 W509
No.3 N513

No.2 N511
No.1 N512

Our group study rooms have become amazing places where we can learn and have a great time together. Come on in and feel free to dive into your studies, share your ideas, and create a warm atmosphere of friendship and knowledge!

Roary’s Tip: How to make the MaxHub touchable
BY NAMUUNAA KHISHIGJARGAL
Roary’s Tip: MaxHub Mastery Without Dongle
MaxHub Mastery 2
— without Dongle:
Conquer Your Studies!
Roary shared about how to use MaxHub monitors with a dongle last week, so this week it’s time to talk about how to use them without a dongle.
Unlock the full potential of the library’s group study rooms with these helpful MaxHub tips below!
W517 N501 N502 N503 N504
N510 N512 N513 N514 N515
All these rooms are equipped with a MaxHub.
Getting Started
Press the MaxHub’s power button (found at the bottom right corner of the device)
Device Without Dongle Instructions:
1. Visit MaxHub Support website.
Scroll down to the “Download Center” section and click on “Software”, then select “MaxHub Share” from the options provided.
2. Download the version that matches your device’s specifications.
3. Open the application
4. Enter the code shown on the MaxHub screen OR directly connect with your laptop by double-clicking the correct monitor screen.
5. Begin to share your device’s content on the MaxHub monitor! Seamlessly transfer files to the big screen for an engaging experience. Happy Studying!
Please note that the MaxHub User Manual is now conveniently attached behind each GSR’s door.
BY NAMUUNAA KHISHIGJARGAL & IRENE LU
TYPESETTING BY IRENE LU
Roary’s Tip: MaxHub Mastery with Dongle
MaxHub Mastery 1
— with Dongle:
Conquer Your Studies!
Wondering what the big screens in group study rooms are for? Well, you’re in for a treat! The MaxHub monitors are awesome for collaborative studying.
Learn more about how to maximize your study sessions with the Maxhub monitors below!
W517 N501 N502 N503 N504
N510 N512 N513 N514 N515
All these rooms are equipped with a MaxHub.
Getting Started:
Press the MaxHub’s power button (found at the bottom left corner of the device).
Try out the Whiteboard application – it’s great for boosting collaboration and supercharging your productivity!
……………………………………………………………
Device with Dongle Instructions:
1. Plug the dongle into the screen and press the triangle-shaped button (it will light up).
2. Remove the dongle from the Maxhub after the device update is complete.
3. Insert the dongle into your device.
4. Go to the bottom right corner of the MaxHub monitor, click on “Input Source,” and then select “Screenshare” .
Screenshare Activated, Happy Studying!
Please note that the MaxHub User Manual is now conveniently attached behind each GSR’s door.
BY NAMUUNAA KHISHIGJARGAL & IRENE LU
TYPESETTING BY IRENE LU
Roary’s Tip: Connecting to Sony Monitors in the GSR
Looking for a space to do a group discussion or presentation? Want to get your team on the same page? Let Roary show you how to connect to the Sony monitors in the library’s Group Study Rooms.
N511 N516 N517 N518 N601 N602 N603 N604 N605
All these rooms are equipped with a Sony screen. (Projection only)
Turning on Sony Monitor
The power button is usually found at the bottom of the center.
Connecting Your Device
Connect your device to the Sony monitors using the HDMI cable already connected to it.
Select the Input Source
Use the source button on the monitor to select the correct input source (e.g., HDMI 2).
Tips for Audio Configuration Toubleshooting
1. Check if your device’s audio output is connected to the monitor’s audio input.
2. Adjust the volume using the monitor’s volume controls or your device’s settings.
YOU ROCK!
Enjoy your time in the Group Study Room!

Roary’s Tip: How to check into Library Group Study Room
Library group study rooms are currently very popular reserved study areas. With different room setups, they can meet the various needs of different groups of patrons.
N510 (Capacity:6) with MaxHub
N511 (capacity: 4) with Sony Screen
N513 (Capacity:3) with MaxHub
W512 (Capacity:2) with Whiteboard
Check how to make a reservation of your dream room.
Wait… I have a question! After I made the reservation, how can I check into the group study room?
- Before the reserved time slot, the monitor interface for each room is blue. When your reservation time slot arrives, you can start the check-in process.
2. Within the first 15 minutes of your reservation time slot, you can confirm your reservation by clicking “CHECK IN” on the screen and tapping the cards you registered for booking the room. (Refer to the below images for two tapping positions.)
If check-in is not completed within 15 minutes, the room will be released back to the reservation system.
3. After the room check-in is successfully confirmed, the monitor interface will turn purplish red and your study group can enjoy your time in this room now! Hooray!
4. We kindly ask that more than half of the room’s maximum capacity check-in. So gather your study buddies and make sure to get everyone on board for a successful reservation.
Happy studying!
BY FISHER YU
TYPESETTING BY FISHER YU